Python Environment for a Jupyter Notebook Experience in Neovim
A practical explanation of how Neovim, Jupyter kernels, and multiple Python environments fit together for an interactive, notebook-like workflow.
I ran into several issues while setting up Python environments and configuring the necessary plugins to create a Jupyter Notebook-like experience in Neovim. This article isn’t meant to be a complete guide to installing these plugins, but rather a focused explanation on how to configure Neovim to work with different Python environments - and more importantly, to clarify the relationship between those environments and the various moving parts of this workflow.
Here’s the set of plugins I use for this setup (installation instructions are provided in their respective documentation):
- molten-nvim (including image.nvim)
- quarto-nvim
- jupytext: Converts
.ipynbback and forth between Quarto and Jupyter Notebooks - venv-selector: Select environment for Neovims LSP
I use Conda to manage Python environments, but the concepts here should transfer to other tools like venv. Also, I configure Neovim using Lua, so my examples follow that convention.
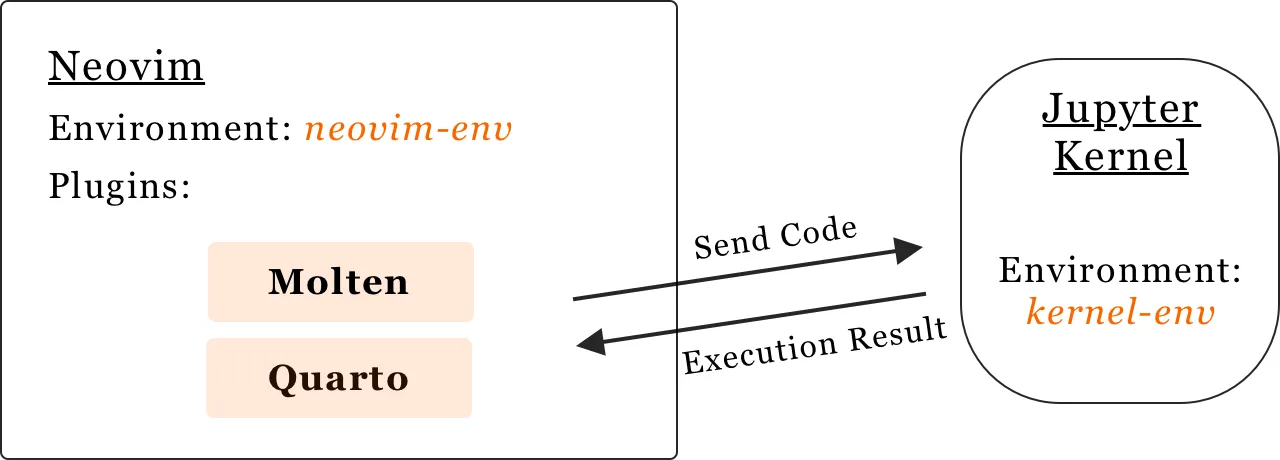
The goal is to write and run code inside Neovim using different, purpose-specific environments (e.g., for machine learning, data analysis, etc.) - while Neovim itself runs in its own minimal environment used strictly for managing plugins and the editor core.
Neovim Environment
Neovim needs two things from your Python setup:
- A Python interpreter for plugin execution (set via python3_host_prog)
- An extended PATH to locate CLI tools like jupytext, which some plugins may rely on
Here’s how I configured Neovim to use my Conda-based environment:
-- Path to the Conda environment I created for Neovim itself
local conda_neovim_path = "/opt/homebrew/Caskroom/miniconda/base/envs/neovim-env/bin/"

-- 1. Let Neovim know which Python binary to use internally
vim.g.python3_host_prog = conda_neovim_path .. "python3"

-- 2. Extend Neovim's PATH to find executables like jupytext (used to auto-convert .ipynb files to .qmd)
vim.env.PATH = conda_neovim_path .. ":" .. vim.env.PATH
For LSP-related features like autocompletion and diagnostics, I use venv-selector. nvim to easily switch between environments on a per-project basis.
Jupyter Kernel
A Jupyter kernel is the process that actually runs your code. It listens for commands over a ZMQ interface and returns output, errors, or rich data back to the frontend (e.g., Neovim, Quarto, VS Code, etc.).
Each kernel is tied to a specific Python environment and must be explicitly registered:
python -m ipykernel install --user --name kernel-envThis creates a kernel definition (kernel.json) like this:
{
  "argv": [
    "/path/bin/python",
    "-m",
    "ipykernel_launcher",
    "-f",
    "{connection_file}"
  ],
  "display_name": "Python (kernel-env)",
  "language": "python"
}
You’ll want ipykernel installed inside every environment you intend to register as a Jupyter kernel. Here’s a minimal environment.yml example:
name: kernel-env
channels:
  - defaults
  - conda-forge
dependencies:
  # This is always necessary for environments used as kernels
  - ipykernel

  # ---------- Environment Dependencies ---------- #
  - pandas
  - matplotlib
This modular setup makes it easy to manage dedicated environments for various tasks - e.g., ml, finance, visualization, etc.
Molten and Quarto
To configure the kernel which is used by Molten the plugin has its own action called MoltenInit. This Command opens a context menu where you can select one of the kernels created with the shell command from the last section.
For previewing and rendering .qmd files, I use quarto-nvim, which requires some additional configuration.
First, you must tell Quarto which Python interpreter to use:
vim.env.QUARTO_PYTHON = "/opt/homebrew/Caskroom/miniconda/base/envs/neovim-env/bin/python"This path needs to point to the Python binary of the environment where Quarto-related packages like nbclient and nbformat are installed.
Then, inside your .qmd document, you specify which Jupyter kernel should run the embedded code:
---
title: My Quarto Document
jupyter: kernel-env
---
This jupyter key must match the kernel name you registered earlier via ipykernel install.
Full Configuration Example
-- MOLTEN --
local g = vim.g
g.molten_image_provider = "image.nvim"
g.molten_output_win_max_height = 20
g.molten_output_virt_lines = true
g.molten_virt_text_output = true
g.molten_auto_open_output = false
g.molten_save_path = vim.fn.stdpath("data") .. "/molten"
-- QUARTO --
vim.env.QUARTO_PYTHON = "/opt/homebrew/Caskroom/miniconda/base/envs/neovim/bin/python"
require("quarto").setup({
codeRunner = {
enabled = true,
default_method = "molten",
ft_runners = { python = "molten" },
never_run = { "yaml" },
},
})
-- Keybindings --
local wk = require("which-key")
local runner = require("quarto.runner")
local quarto = require("quarto")
wk.add({
{ "<leader>j", group = "jupyter", icon = { icon = "", color = "blue" } },
{ "<leader>jA", runner.run_all, desc = "All Cells" },
{ "<leader>ja", runner.run_above, desc = "Cell and Above" },
{ "<leader>jc", runner.run_cell, desc = "Cell" },
{ "<leader>jl", runner.run_line, desc = "Line" },
{ "<leader>jp", quarto.quartoPreview, desc = "Open Preview" },
{ "<leader>jq", quarto.quartoClosePreview, desc = "Close Preview" },
{ "<leader>jd", ":MoltenLoad<cr>", desc = "Load Molten State" },
{ "<leader>jc", create_kernel_from_conda, desc = "Create Kernel" },
{ "<leader>js", ":MoltenSave<cr>", desc = "Save Molten State" },
{ "<leader>ji", ":MoltenInit<cr>", desc = "Init Molten" },
{ "<leader>jD", ":MoltenDeinit<cr>", desc = "Deinit Molten" },
{ "<leader>jI", ":MoltenImagePopup<cr>", desc = "Show Image" },
{ "<leader>jo", ":MoltenShowOutput<cr>", desc = "Show Output" },
{ "<leader>jv", "<cmd>VenvSelect<cr>", desc = "Select LSP Env" },
})Next Steps
Some ideas for future improvements:
- Add a Lua command to create Jupyter kernels from within Neovim
- Make Python paths configurable and less hardcoded
- Auto-detect active environment and set QUARTO_PYTHON dynamically
This setup has helped me bring together interactive Python execution, code editing, and document preview directly inside Neovim. It’s not perfect, but it’s practical and works well once the different environments are correctly configured. I hope this overview helps others avoid some of the confusion I ran into.
Found this useful? Leave a signal.
Note on authorship: This text was developed with the support of AI tools, used for drafting and refinement. Responsibility for content, structure, and conclusions remains with the author.